Part 1: Step 0

This content is based on the H1 tasks of Data Security by Mr. Karvinen. We will have a look at some theoretical background and step-by-step guides and setup instructions to get our hands dirty.

Intelligence-Driven Computer Network Defense Informed by Analysis of Adversary Campaigns and Intrusion Kill Chains.

  • Traditional incident response methods are reactive, which renders them partially inefficient in many current scenarios.
  • New threats such as APT (advanced persistent threat) are on the rise. They are based around undetected system infiltration which can span over years. Such attacks are usually highly sophisticated and difficult to defend against if they are not specifically expected and the target does not possess any background information of the threat actors.
  • Kill chain models can improve the defense mitigate the vulnerability against such attacks by mapping potential attack structures, and reducing the risk as well as success rate of APTs.

Kill chains are systematic processes for the engagement and targeting of an objective, which originally originated in the military complex. In the world of data security the same model has served as useful base in areas such as intrusions.

Kill Chain Phases (from a computer network attack perspective)
  1. Reconnaissance: Identify the target and gather intelligence. This includes among others digital, physical, and human resources.
  2. Weaponization: The preparation of a deliverable payload. This can be digital files or physical devices which will be weaponized with malicious functionality.
  3. Delivery: The transmission or delivery of the weaponized payload. This could be an email attachment, USB device, etc.
  4. Exploitation: Once the delivery is successful the payload will be triggered/executed.
  5. Installation: With the help of the triggered payload we ensure persistence in the target system and accessibility from the outside.
  6. Command and Control (C2): Compromised targets often report to a control server to establish a C2 channel.
  7. Action on Objectives: After all previous phases are completed we can begin with the main part of the attack. This could be data theft, encryption, sabotage, further compromise, etc.

By gaining a full understanding of the kill chain, it becomes easier to detect and test for potential paths of attack, as well as test how effective the implemented defenses are. This is easier said than done and also depends strongly on the capabilities of both the attacker and defender.

Since this process is rather resource intensive and difficult to quantify in terms of ROI, many companies ignore its importance until it is too late. We can see a reflection of that in the countless news articles where extremely sensitive data is stolen, encrypted through ransomware, and so on. These cases span from power plants, voting systems, defense manufacturers, to insurances, and so on.

Linux Command Line Basics

When working with Linux we will sooner or later have to deal with the command line. Below are a couple essential commands that will make the start a bit easier.

Navigating

  • pwd --> print current directory
  • ls --> list files in current directory
  • cd --> change directory

File handling

  • nano --> text editor current directory
  • cat --> prints the contents of a file. It can also be used to create files.
  • mkdir --> create folder
  • rmdir --> remove folder
  • rm --> remove file
  • find --> locates files

Help

  • man --> shows the manual for a command, as example "man ls"

There are a obviously many other commands which are just as important, if not more. You find some of them in the sources linked below. Do not forget that you can use the commands in combination with the man command to receive additional information.

Installing Debian on VirtualBox

This is a rather straight process. We will require two things here. One is a Linux ISO (I used Debian 11) and VirtualBox from Oracle.Please click the buttons below to get straight to their respective download page.

Step by Step Process

  1. Install VirtualBox and create a new virtual machine. You can set the parameters according to your desired use. Make sure that the operating system parameter matches the one you are planning to install. The storage allocation can be set to dynamic, which prevents that unnecessary disk space on the host will be blocked. I was quite generous here since my host computer has a lot of resources. So your mileage may vary.
  2. Under the IDE controller property make sure that you mount your downloaded ISO file to a virtual disk drive, so that you can begin with the OS installation once you spin up the VM.
  3. Lets start the VM. We should now be presented with the installation menu of the mounted operating system disc.
  4. Just follow allow the guided installation and When the process is complete you will have to restart the VM and are now good to go.
  5. To update and upgrade the system to the latest state we can run the following two commands:
    $ sudo apt-get update
    $ sudo apt-get -y dist-upgrade

PS: it might be useful to boot up first a live environment before installing it to ensure that everything performs to your liking. More detailed step-by-step instructions can be found in the source linked below.

Installing Webgoat 8

WebGoat is a purposefully insecure web app, which is extremely handy for the practicing and testing of security related techniques. Before we install it we should ensure that the following prerequisites are met:

  • UFW firewall installed and enables
  • Java installed

To install and start WebGoat we can run the following two commands

  • wget https://github.com/WebGoat/WebGoat/releases/download/v8.0.0.M26/webgoat-server-8.0.0.M26.jar
  • java -jar webgoat-server-8.0.0.M26.jar
Once those steps are complete we can verify that everything is running by opening up http://localhost:8080/WebGoat/. If everything went as planned we should see the following screen 
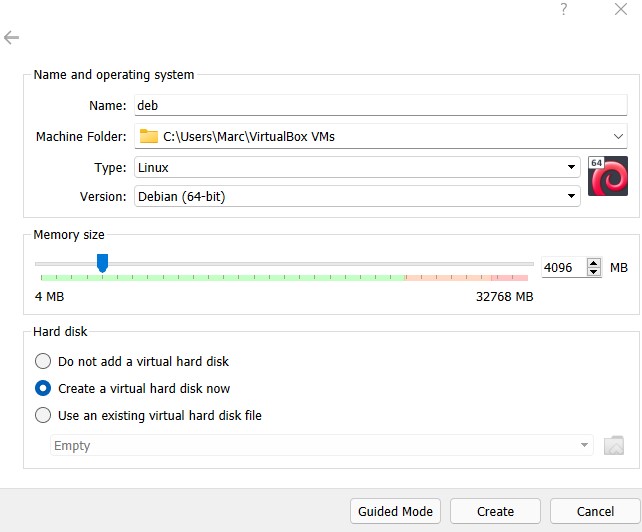
To proceed further we will have to create a new user on the web-interface. Once that is done we are ready to go.

More detailed information and steps can be found in the source linked below.

Over The Wire: Bandit (Level 0-7)

Nothing is better than a bit of hands-on practice. With the help of Bandit and a SSH connection we got a great option to do exactly that.

Level 0

We are starting off very easy. With ls we see that there is a file called readme. cat readme will provide us with the password for the next level: boJ9jbbUNNfktd78OOpsqOltutMc3MY1

Level 1

With the help of ls we see that the file is named "-". Lets open it with cat ./-. The password we now see is: CV1DtqXWVFXTvM2F0k09SHz0YwRINYA9

Level 2

Since we know the name of the file is "spaces in this filename", the command cat "spaces in this filename" will return the password: UmHadQclWmgdLOKQ3YNgjWxGoRMb5luK

Level 3

We know the file is hidden in the directory "inhere". Lets move to that directory with cd inhere. With ls -a we will list all of the files in the directory, no matter if hidden or not. We see that the hidden file is named ".hidden". Now we simply execute cat .hidden and we will see the next password: pIwrPrtPN36QITSp3EQaw936yaFoFgAB

Level 4

The password is stored in a human-readable file inside the directory "inhere" lets change to this directory with the cd command. With ls we can see that there are 9 files in here. We could either manually check each of them or we simply run file ./-file0* which will list the file types of these files. Since only file07 is in ASCII text, the password must be in there. Lets run cat ./-file07 and we get the password: koReBOKuIDDepwhWk7jZC0RTdopnAYKh

Level 5

We know the password is in the directory "inhere", it is 1033 bytes large, human readable, and not executable. So lets move into the folder and see if we can find something with those parameters find -type f -size 1033c ! -executable. Bingo, we found something in "./maybehere07/.file2". Once we open the file with cat we will get the password: DXjZPULLxYr17uwoI01bNLQbtFemEgo7

Level 6

Almost like the previous level we are given some file properties again and have to find it. We know the owning user and group, as well as the size of 33 bytes. So lets run find / -type f -group bandit6 -user bandit7 -size 33c from the root directory. Looks like the file we are looking for is "/var/lib/dpkg/info/bandit7.password". If we open that with cat we will see the following password: HKBPTKQnIay4Fw76bEy8PVxKEDQRKTzs

Level 7

We know the filename is "data.txt" and the password is next to the word millionth. Lets run grep -n "millionth" data.txt and we will see that the password is cvX2JJa4CFALtqS87jk27qwqGhBM9plV L